编译安装
从 OpenSSL 官网 下载 OpenSSL 1.1.1w 版本源码并解压:
1
2
3
4
|
wget https://www.openssl.org/source/old/1.1.1/openssl-1.1.1w.tar.gz
tar -xvf openssl-1.1.1w.tar.gz
ls -lh
drwxrwxr-x 19 xx xx 4.0K  9月 11  2023 openssl-1.1.1w
|
OpenSSL 编译安装后最终后生成以下几个目录:
1
2
3
4
5
|
drwxrwxr-x 2 xx xx 4.0K  4月  9 10:52 bin
drwxrwxr-x 3 xx xx 4.0K  4月  9 10:52 include
drwxrwxr-x 4 xx xx 4.0K  4月  9 10:52 lib
drwxrwxr-x 4 xx xx 4.0K  4月  9 10:53 share
drwxrwxr-x 5 xx xx 4.0K  4月  9 10:52 ssl
|
可阅读参考源码目录下的INSTALL,以下是部分可配置项:
-
–prefix=DIR : bin, lib, include, share 等安装目录的前缀,自定义指定时需为绝对路径,Unix 下默认为 /usr/local,
-
–openssldir=DIR :OpenSSL 配置文件和证书等输出目录,默认是/usr/local/ssl,
-
–libdir=DIR :库文件输出目录,生成在 prefix 目录下,也可以直接指定绝对路径,
-
–debug : 编译携带调试信息的OpenSSL 版本,编译优化 0 级别,
-
–release :默认编译的版本,Release 版,没有调试信息,
-
zlib 相关:
-
–with-zlib-include=DIR
-
–with-zlib-lib=LIB
-
–no-xx 系列:
- –no-shared: 不生成动态库,
- –no-asm
- –no-async
- ….
可以直接在 OpenSSL 源码目录下直接./config && make 也可以,在其他地方新建 build 目录,然后执行/path/to/openssl/config && make 编译。对于后者,编译生成的中间文件不会在 OpenSSL 源码树中,更简洁一些。
几种安装选择:
-
make install :完全安装 bin, lib, include, share等目录到指定目录
-
make install_sw:只安装 bin, lib, include
-
make_install_docs: 只安装文档文件,即share目录
-
make install_man_docs : 只安装 share/man 文档文件到指定目录
-
make install_html_docs : 只安装 share/doc/openssl/html/ 文档文件到指定目录
 1
 2
 3
 4
 5
 6
 7
 8
 9
10
11
12
13
14
15
16
17
18
19
20
21
22
23
24
25
|
# build release
mkdir build_release && pushd build_release
../openssl-1.1.1w/config --prefix=/path/to/install/release --release
make -j4
make install_sw
popd

# execute release openssl
export LD_LIBRARY_PATH=./install/release/lib/:$LD_LIBRARY_PATH
./install/release/bin/openssl version
OpenSSL 1.1.1w  11 Sep 2023

####################################################################

# build debug
mkdir build_debug && pushd build_debug
../openssl-1.1.1w/config --prefix=/path/to/install/debug --debug
make -j4
make install_sw
popd

# execute debug openssl
export LD_LIBRARY_PATH=./install/debug/lib/:$LD_LIBRARY_PATH
./install/debug/bin/openssl version
OpenSSL 1.1.1w  11 Sep 2023
|
使用示例
s_client
查看 SSL/TLS 协议握手过程的子消息:
 1
 2
 3
 4
 5
 6
 7
 8
 9
10
11
12
13
14
15
16
17
18
19
20
21
22
23
24
25
26
27
28
29
30
31
|
export LD_LIBRARY_PATH=./install/debug/lib/:$LD_LIBRARY_PATH
./install/debug/bin/openssl s_client -debug -connect www.baidu.com:443 \
-keylogfile sslkey.log -state -prexit -tls1_2 >/dev/null
SSL_connect:before SSL initialization
SSL_connect:SSLv3/TLS write client hello
SSL_connect:SSLv3/TLS write client hello
SSL_connect:SSLv3/TLS read server hello
depth=2 OU = GlobalSign Root CA - R3, O = GlobalSign, CN = GlobalSign
verify error:num=20:unable to get local issuer certificate
verify return:1
depth=1 C = BE, O = GlobalSign nv-sa, CN = GlobalSign RSA OV SSL CA 2018
verify return:1
depth=0 C = CN, ST = beijing, L = beijing, O = "Beijing Baidu Netcom Science Technology Co., Ltd", CN = baidu.com
verify return:1
SSL_connect:SSLv3/TLS read server certificate
SSL_connect:SSLv3/TLS read server key exchange
SSL_connect:SSLv3/TLS read server done
SSL_connect:SSLv3/TLS write client key exchange
SSL_connect:SSLv3/TLS write change cipher spec
SSL_connect:SSLv3/TLS write finished
SSL_connect:SSLv3/TLS write finished
SSL_connect:SSLv3/TLS read server session ticket
SSL_connect:SSLv3/TLS read change cipher spec
SSL_connect:SSLv3/TLS read finished

SSL3 alert read⚠️close notify
SSL3 alert write⚠️close notify

# master key
cat sslkey.log
CLIENT_RANDOM c38938506f7cf9b5227d8db210188a0b7422bbc3dbe7a9905e733fa6c5077946 44ac983f7ff54ab996040cc78dcdda7180d5fc7441f32a5e59436f2ba62ec20657eccb49f79d4f229d8abdb6273cce67
|
s_server
生成私钥与证书:
1
2
3
|
openssl genrsa -des3 -out server.key 2048
openssl req -new -key server.key -out server.csr
openssl x509 -req -days 36500 -in server.csr -signkey server.key -out server.crt
|
运行:
1
2
3
4
|
./install/debug/bin/openssl s_server -key server.key  -cert server.crt -debug -accept 10443
Enter pass phrase for server.key:
Using default temp DH parameters
ACCEPT
|
HTTPS 服务端示例
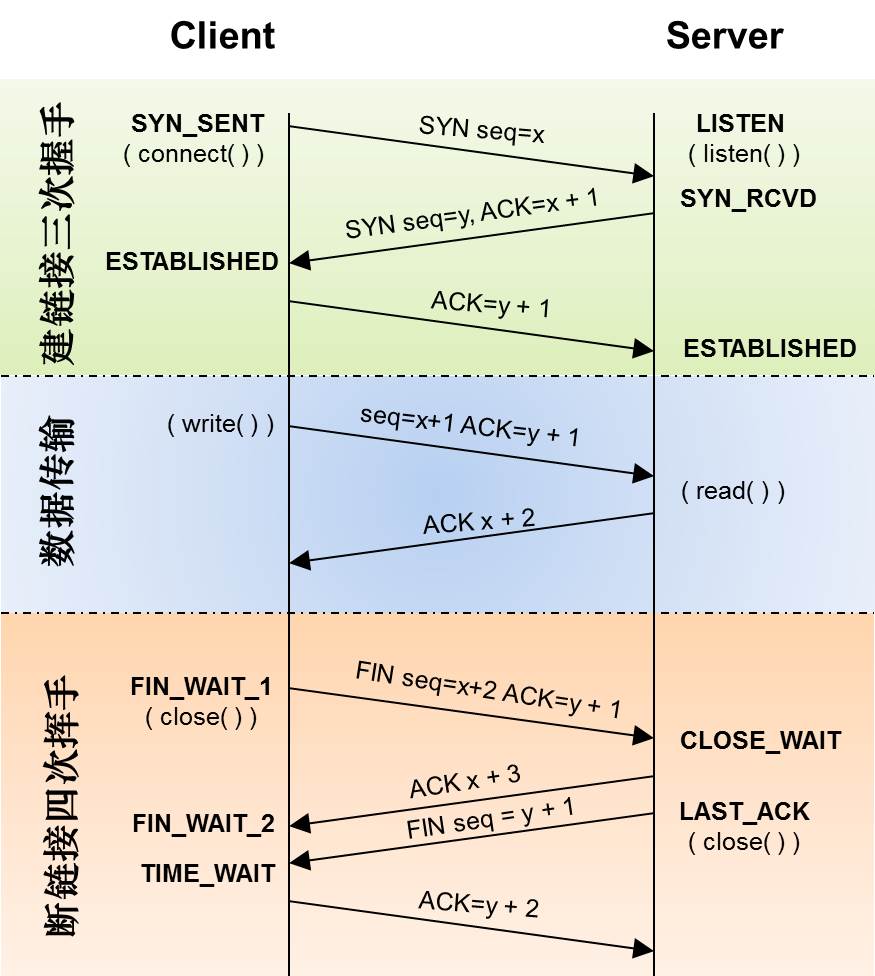
常规的 HTTP 服务器

图片来源:https://www.s0nnet.com/archives/tcp-status
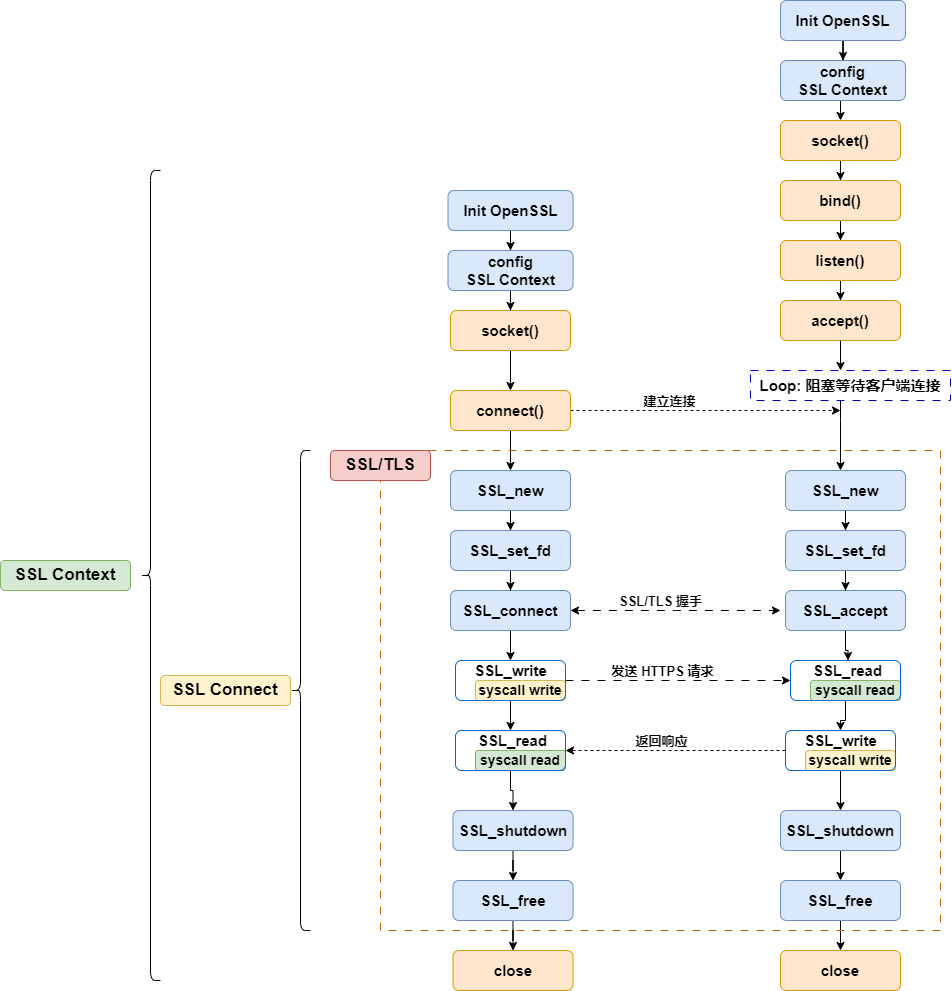
SSL/TLS 的 HTTPS 服务器

基于 Linux Socket API 的 HTTP 服务端基本流程是:
-
创建一个 AF_INET/AF_INET6 类型的 socket 连接,
-
将 socket 绑定bind到对应的地址,并监听 listen 该socket,
-
使用 accept 等待客户端连接监听的 socket 地址,
-
客户端 connect 连接后,双端使用 read/write 等函数调用发送/接收消息,
-
最后关闭 close
基于 Linux Socket API 和 OpenSSL 的 HTTPS 服务端基本流程是:
-
初始化 OpenSSL ,
-
创建全局的 SSL Context 上下文信息,上下文信息对象包含了 SSL/TLS 方法等信息,
-
使用 SSL_accept/SSL_connect 握手连接,创建 SSL Connect 连接对象,
-
使用SSL_read/SSL_write 传输数据,
-
关闭释放 SSL 对象,
-
关闭 socket
参考资料
/docs/man1.1.1/man1/openssl-s_client.html
下载、编译、安装、使用、调试openssl最新版-腾讯云开发者社区-腾讯云


